
Welcome to Morrgan's Creatures, a place on the net where I show off handmade creatures and creations of my own design.
Tuesday, June 29, 2010


Saturday, June 19, 2010
A brief summer holiday
It's vacation time! I've decided to take a week or so off the internet, starting tomorrow, to enjoy the (short) Finnish summer outdoors and recharge my batteries. My shops (Etsy, ArtFire, Dawanda) will be closed during this time and I will only answer emails after my summer vacation. This blog will also be on a break.
 So, if you'd like a pattern to work on over midsummer, or have your eye on something else you'd like from one of my shops (such as my latest magnetic creature, the mighty mouse on the right here), now is the time to order!
See you soon!
So, if you'd like a pattern to work on over midsummer, or have your eye on something else you'd like from one of my shops (such as my latest magnetic creature, the mighty mouse on the right here), now is the time to order!See you soon!
Labels:
crochet,
knitting,
Morrgan's creatures

Wednesday, June 16, 2010
Tiny Dragons - The 2nd batch
 The 2nd batch of five tiny dragons is ready for introductions. From the left to the right:
#6. Rose - pink and pale beige
#7. Marigold - saffron yellow and dark brown
#8. Ash - mossy green and brown
#9. Lily - light purple and purple
#10. Hollis - beige and brown
Here's how it works: Every now and then I make a batch of 5 dragons. Each dragon will have a unique set of colours and they will get a signed hatching certificate with their name, number and date. When they're ready to list, I post an introduction on this blog like the one above. During the following few days, I'll list them in numerical order in my Etsy shop. Should you happen to spot one you must have, let me know and I can reserve it for you.
Labels:
crochet,
knitting,
Morrgan's creatures,
Tiny Dragons
Tuesday, June 15, 2010
Tuesday Finds: Bees and Bs
*ponders what a giant 'M' would look like on the balcony, as something for the vines to climb on...*


Labels:
other crafty things,
Tuesday Finds
Thursday, June 10, 2010
Smoothies, perfect for summer time
It's my birthday! And Mr Morrgan the sweetie woke me up with coffee in bed and made French toast with lemon curd for breakfast. Yay and yum! =)
In other news, it's warm and lovely here again, after a week or so of colder weather, and we have been trying out old and new summery drinks. My current favourites for lunch are smoothies, especially nice when made with berries from my parents' garden and enjoyed on the sunny balcony. I thought I'd share a couple of recipes.
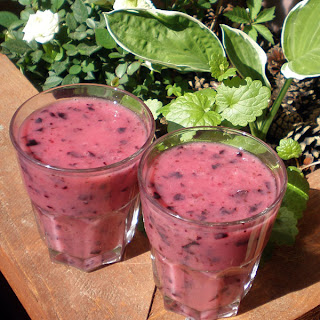
I use frozen berries to get a nice cool drink, but fresh ones could be used too. Making them is very easy, just mix everything together with a blender. Simple, fast and yummy! For some fun and equally easy experimenting with flavours, try using different berries and juices.
Blackcurrant-Banana Smoothie (pictured)
2 bananas
1-2 dl (~1/2-4/5 cup) blackcurrants
1 tbsp honey
2,5 dl (1 cup) water
Berry Mix Smoothie
1 banana
1 dl (~1/2 cup) raspberries
1/2 dl (~1/4 cup) blackcurrants
2 dl fruit juice of your choice
In other news, it's warm and lovely here again, after a week or so of colder weather, and we have been trying out old and new summery drinks. My current favourites for lunch are smoothies, especially nice when made with berries from my parents' garden and enjoyed on the sunny balcony. I thought I'd share a couple of recipes.
I use frozen berries to get a nice cool drink, but fresh ones could be used too. Making them is very easy, just mix everything together with a blender. Simple, fast and yummy! For some fun and equally easy experimenting with flavours, try using different berries and juices.
Blackcurrant-Banana Smoothie (pictured)
2 bananas
1-2 dl (~1/2-4/5 cup) blackcurrants
1 tbsp honey
2,5 dl (1 cup) water
Berry Mix Smoothie
1 banana
1 dl (~1/2 cup) raspberries
1/2 dl (~1/4 cup) blackcurrants
2 dl fruit juice of your choice
Tuesday, June 08, 2010


Sunday, June 06, 2010
Introducing Paulo the Charming Tiger
 This is Paulo the charming tiger.
Mister Paulo knows how to charm the ladies. His secret? He's actually sincere.
When he says he bought these roses because their loveliness reminded him of you, that's what he did.
When he says that as lovely as they are, they pale next to your beauty, he really means it.
And the ladies know it. Oh Paulo, you charmer.
 Paulo is my entry for this week's European Street Team challenge, hosted by Sofia-Sobeide. The theme for this week was "my favourite flower". Now, how do you get a charming tiger from favourite flowers?
To be honest, I'm not entirely sure myself.
 However, the inspiration for Paulo and his personality came to me as I was sitting in my balcony, trying to decide on a fave flower. I looked at my red miniature rose and suddenly the choice was clear - roses. Soon after, the idea of a sweet little tiger holding a bouquet of lovely red roses came to me. How? Why? Who knows. The mental image stuck and I had to try to make Paulo. I'm very pleased that he turned out exactly as I saw him with my mind's eye.
Paulo the Charming Tiger is available as a pattern via Ravelry (or click here to buy now - no Ravelry account needed) and from my Etsy shop.
His roses are also available as a separate tutorial, suitable for beginners.
Want to see more creature introductions?
Labels:
Creature introductions,
knitting,
Morrgan's creatures,
patterns,
plants
Friday, June 04, 2010
Introducing the Tiny Dragons - the first five
 Here we go! The first five of the tiny dragons are ready for introductions. From the left to the right:
#1. Daisy - creamy white and grey
#2. Rupert - turquoise and teal
#3. Charles - grey and black
#4. Olivia - mossy green and dark green
#5. Elinor - pale beige and turquoise
I realized I really missed making dragons. My fingers were itching to make some. So create dragons I did. And more I shall create, because I also realized I want to make a huge collection of different ones. These five are the beginning of that collection. Each dragon will have a unique set of colours and they will get a signed hatching certificate with their name, number and date.
I have the following idea in mind. Every now and then I make a batch of 5 dragons. When they're ready to list, I post an introduction on this blog like the one above. During the following few days, I'll list them in numerical order in my Etsy shop. Should you happen to spot one you must have, let me know and I can reserve it for you.
You know, there's something very pleasing about creating a tiny dragon. There really is.
Thursday, June 03, 2010
My Creative Space: Teasers
Well, the major news of this week is that the pattern redesign I mentioned in my Creative Space post from a couple of weeks ago is finished! It was a huge chunk of work, but I'm so pleased to have it done. All redesigned patterns can be seen in my Etsy shop.
Now with that out of the way, I can put my energy towards new patterns and other designs. I have none quite ready to show you yet, but I can give you a few sneak peeks into what I've been working on.
 My my, who might this mysterious, handsome stranger be...
 ...and what are these fine gifts he brings?
 These guys might seem familiar to you from way, way back.
More pictures and info on both projects to come later! I'm very, very excited about these, as well as several more projects that are still only in the planning stage. Suddenly I keep having idea after idea and the only problem is when to find the time for them all. I like it. =)
Want to see the creative spaces of others? Head on over to Kootoyoo's blog for a look!
Now with that out of the way, I can put my energy towards new patterns and other designs. I have none quite ready to show you yet, but I can give you a few sneak peeks into what I've been working on.
My my, who might this mysterious, handsome stranger be... ...and what are these fine gifts he brings? These guys might seem familiar to you from way, way back.More pictures and info on both projects to come later! I'm very, very excited about these, as well as several more projects that are still only in the planning stage. Suddenly I keep having idea after idea and the only problem is when to find the time for them all. I like it. =)
Want to see the creative spaces of others? Head on over to Kootoyoo's blog for a look!
Labels:
knitting,
Morrgan's creatures,
My Creative Space
Tuesday, June 01, 2010
Tuesday Finds: Mad Science and World Domination
A recent tweet by Huismus linked to the global domination notebook below. This brought back memories of a running joke back from when I was still only planning to study biology, about my goal being world domination through genetically engineered, trained killer potatoes (tomatoes were sooo overdone and potatoes were better suited for the Finnish climate anyway). Ah, the dreams of youth.


Labels:
art,
books,
clothing,
for great science,
home decor,
other crafty things,
Tuesday Finds
Sunday, May 30, 2010
Morrgan's Great Sewing Adventures, part 1
You may remember that I recently obtained a sewing machine. The first practise session after that previous post didn't go all that well. I spent most of it wondering why everything looked pretty on top, like this...

...while below it was a total mess, like this:

The machine didn't come with a manual, used as it was, so it took half an hour of fiddling with settings, running to the computer to google various search terms (it didn't help that I had forgotten most sewing machine terminology), and running back to the sewing machine to test something new, etc. In the end I was able to find the manual online and it turned out the problem was a poorly threaded machine. Yay, learned something new! Not-so-yay, I wasted all my practise time on figuring this out.
A few days ago I got the chance to try again. As it's been 15 or so years since I last did any sewing, I decided to start with a simple project: a fabric storage box for my yarns. A simple box shape, straight seams only, small and quick to finish - seemed perfect. After all, how hard could it be?
Well, pretty darn hard, it turns out! I haven't used ready-made patterns for 15 years either, so I just calculated some suitable rectangle shapes to sew together into a box. I will not tell you how I did it, because it was probably the silliest way to make a box, ever. For one, I added too little seam allovance. Second, I hadn't quite realized that sewing corners isn't all that straight-forward:

However, after much head-scratching, pondering, unraveling and resewing, I managed to get something vaguely box-shaped together!
 So yes, it ended up a bit narrower than planned and yes, the corners are - ahem - interesting, but at least it does its job. And on the plus side, I still know how to sew a pretty straight seam.
I also put together a small list of a few things I need before the next project:

...while below it was a total mess, like this:

The machine didn't come with a manual, used as it was, so it took half an hour of fiddling with settings, running to the computer to google various search terms (it didn't help that I had forgotten most sewing machine terminology), and running back to the sewing machine to test something new, etc. In the end I was able to find the manual online and it turned out the problem was a poorly threaded machine. Yay, learned something new! Not-so-yay, I wasted all my practise time on figuring this out.
A few days ago I got the chance to try again. As it's been 15 or so years since I last did any sewing, I decided to start with a simple project: a fabric storage box for my yarns. A simple box shape, straight seams only, small and quick to finish - seemed perfect. After all, how hard could it be?
Well, pretty darn hard, it turns out! I haven't used ready-made patterns for 15 years either, so I just calculated some suitable rectangle shapes to sew together into a box. I will not tell you how I did it, because it was probably the silliest way to make a box, ever. For one, I added too little seam allovance. Second, I hadn't quite realized that sewing corners isn't all that straight-forward:

However, after much head-scratching, pondering, unraveling and resewing, I managed to get something vaguely box-shaped together!
 So yes, it ended up a bit narrower than planned and yes, the corners are - ahem - interesting, but at least it does its job. And on the plus side, I still know how to sew a pretty straight seam.
I also put together a small list of a few things I need before the next project:
- Sewing thread: This box ended up being sewn with three different colours of thread, because I only had snippets of thread around and had forgotten to buy more. Oops.
- Fabric scissors: The all-round scissors I have are so blunt it's not even funny. They'll stay that way too, for they're used for all kinds of cutting. Best to have a separate pair just for this, methinks.
- A nice and simple fabric box pattern: Any suggestions?
Labels:
sewing
Thursday, May 27, 2010
My Creative Space: Many tiny creatures
This week, my creative space was first filled with many, many tiny bits and pieces of creatures-to-be...
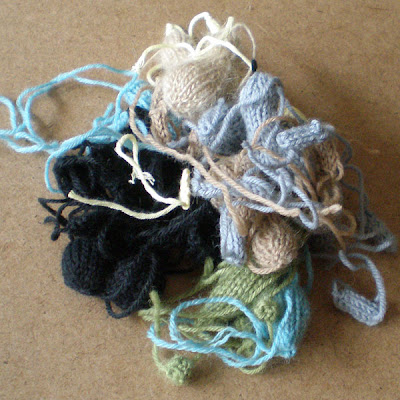
...which I then turned into the actual creatures - lots of magnetic animals, like bats, dinosaurs, kiwi birds, sharks and more.

Phew! I must admit my right wrist actually hurt a bit after finishing all those.
 But that didn't deter me for long, because this week I also finished a pair of arm warmers in a beautiful deep burgundy red. I noticed that the yarn used was the exact same red as one of my little roses on the balcony, which inspired me to try a new style of photos. What do you think?
 Want to see the creative spaces of others? Head on over to Kootoyoo's blog for a look!
...which I then turned into the actual creatures - lots of magnetic animals, like bats, dinosaurs, kiwi birds, sharks and more.
Phew! I must admit my right wrist actually hurt a bit after finishing all those.
But that didn't deter me for long, because this week I also finished a pair of arm warmers in a beautiful deep burgundy red. I noticed that the yarn used was the exact same red as one of my little roses on the balcony, which inspired me to try a new style of photos. What do you think?Want to see the creative spaces of others? Head on over to Kootoyoo's blog for a look!
Tuesday, May 25, 2010


Sunday, May 23, 2010
Flowery DIY Projects: Brooches
It's time for another crafty idea for my crocheted flowers! Here's a brief tutorial on how to use them to make brooches.
(For more ideas, check out the Flowery DIY Projects section.)
 To start things off, here are a few examples to show the different sizes. The purple/pink brooch uses a large and a medium flower, while the beige/white and brown/orange are made with medium and small ones. The blue one, made with a large and a small flower, is used as an example in the tutorial below. The tiny buttons are 8-11 mm (5/16-7/16 in) in diameter.
 Here's what you'll need: scissors, some tiny buttons, a needle, thread, safety pins or preferably proper pin back or bar pins, and of course some crocheted flowers.
 Pick a couple of flowers and a matching tiny button - in this case a small dark blue flower, a large light blue flower and an iridescent blue vintage button. Pull a length of thread through the middle of the flowers, through the button holes and back through the flowers again.
 Pull the thread tight to form the brooch.
 Place the brooch pin on the back, loop the thread around it. Pull the thread through the flowers and button and around the pin a few more times until all parts are securely in place. Sew the pin in place with a few stitches. All done!
(A proper pin back would work better, but I had none available. A small safety needle will do the trick if need be, though.)
(For more ideas, check out the Flowery DIY Projects section.)
 To start things off, here are a few examples to show the different sizes. The purple/pink brooch uses a large and a medium flower, while the beige/white and brown/orange are made with medium and small ones. The blue one, made with a large and a small flower, is used as an example in the tutorial below. The tiny buttons are 8-11 mm (5/16-7/16 in) in diameter. Here's what you'll need: scissors, some tiny buttons, a needle, thread, safety pins or preferably proper pin back or bar pins, and of course some crocheted flowers. Pick a couple of flowers and a matching tiny button - in this case a small dark blue flower, a large light blue flower and an iridescent blue vintage button. Pull a length of thread through the middle of the flowers, through the button holes and back through the flowers again. Pull the thread tight to form the brooch. Place the brooch pin on the back, loop the thread around it. Pull the thread through the flowers and button and around the pin a few more times until all parts are securely in place. Sew the pin in place with a few stitches. All done!
(A proper pin back would work better, but I had none available. A small safety needle will do the trick if need be, though.)
Labels:
crochet,
Flowery DIY projects,
Morrgan's creations
Thursday, May 20, 2010
My Creative Space: Something a bit different
This week I have actually been mostly working on the computer. I decided my creature PDF patterns were in great need of a facelift, especially the older ones, so I have designed a new layout with many new photos. I've also tweaked instructions here and there when needed, to make them more clear.
I'm very excited about this change! It's something I've wanted to do for a long time, but haven't had the time for until now. It takes quite a bit of time and energy, however - I've found that I can only redo one pattern per day. So far I've got a third ready, so I imagine it'll be a couple of weeks before all of them are ready for release.
Want a sneak peek? Here are the patterns for the goldfish and the piggy; old on the left, new on the right:
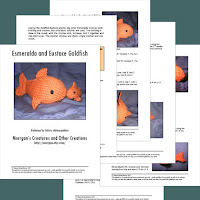


Once the new pattern layout is launched, I also have one or two new patterns to add to the shop!
If you have bought patterns from me before and want them in the new design, just send me a note (Etsy convo, email) once the new layout is available in my shop and I'll send you the new version, free of charge of course.
Want to see the creative spaces of others? Head on over to Kootoyoo's blog for a look!
I'm very excited about this change! It's something I've wanted to do for a long time, but haven't had the time for until now. It takes quite a bit of time and energy, however - I've found that I can only redo one pattern per day. So far I've got a third ready, so I imagine it'll be a couple of weeks before all of them are ready for release.
Want a sneak peek? Here are the patterns for the goldfish and the piggy; old on the left, new on the right:
Once the new pattern layout is launched, I also have one or two new patterns to add to the shop!
If you have bought patterns from me before and want them in the new design, just send me a note (Etsy convo, email) once the new layout is available in my shop and I'll send you the new version, free of charge of course.
Want to see the creative spaces of others? Head on over to Kootoyoo's blog for a look!
Labels:
Morrgan's creatures,
My Creative Space,
patterns
Tuesday, May 18, 2010
Tuesday Finds: Rain
The weather has had a bit of trouble making up its mind lately. At "best" it's been bright hot sun at first, then 10 seconds of pouring rain, then sun again. Yesterday it was pretty and hot as can be in the morning, then storming and thundering in the afternoon. Let's see what today brings...


Labels:
art,
books,
home decor,
jewelry,
other crafty things,
Tuesday Finds
Subscribe to:
Posts (Atom)
